Quick answer
Direct sow dill into its final position from mid-spring, once the soil has warmed, through to midsummer. Choose a sunny, sheltered place with freely draining soil, thin seedlings to 20–30cm according to the cultivar, and water during dry spells. Sow a small batch every two to four weeks if you want leaves over a long season.
Begin taking a few feathery leaves about six weeks after sowing, leaving plenty of foliage on the plant. Pinch out early flower stems when leaves are the priority, or let selected plants form yellow umbels for edible flowers, pollinators and aromatic seed.
Decide what you want to harvest
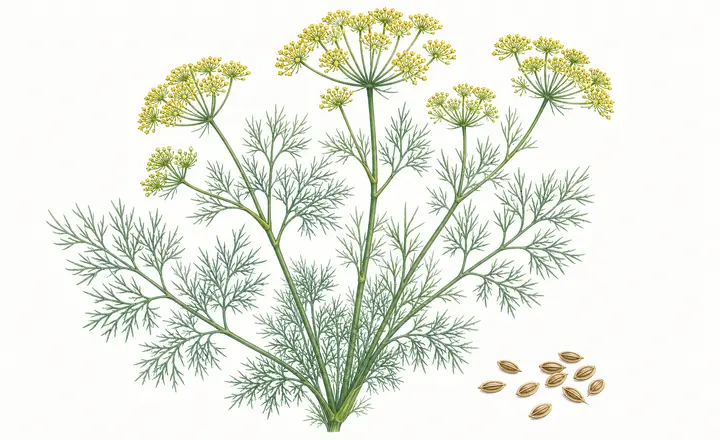
Dill, Anethum graveolens, is an annual in the carrot family. Its leaves, flowers and dry fruits commonly called seeds are all edible, but one plant cannot maximise every harvest at once. Regularly picked leaf plants stay bushier for longer; a seed crop must be allowed to flower and ripen.
Compact, slow-bolting cultivars suit pots and repeated leaf picking. Taller, freely flowering cultivars give longer stems and larger seed heads but need more room and shelter from wind. Check the supplier's mature size and intended use rather than assuming every cultivar behaves alike. The RHS dill guide describes compact leaf types as well as vigorous plants intended for seed.
Do not confuse dill with fennel. Dill has fine aromatic foliage and upright hollow stems but does not make Florence fennel's swollen leaf base. Keep seedlings labelled, especially where several carrot-family herbs are grown together.
Light, soil and shelter
Give dill full sun: six to eight hours of direct light is a useful target. In weak light the stems stretch and become more likely to fall. Place tall plants away from turbulent wind, or add discreet support before flower heads make the stems top-heavy.
Use well-drained, moderately fertile ground. A tested pH around 5.5–6.5 is suitable, but drainage and avoiding extremes matter more than trying to change an untested soil. Work in a modest amount of mature compost only where soil structure or fertility needs it. Rich, heavily fed ground can produce soft growth.
Dill dislikes cold, saturated soil. Delay outdoor sowing until a prepared seedbed is workable and warming; in wet ground, improve the site or use a container rather than trying to compensate with more seed.
Sow and establish dill
Rake the surface to a fine texture, water a shallow drill, sow thinly about 1cm deep and cover lightly. Keep the seed zone damp, not saturated, until seedlings are established. Thin to 20cm for compact plants and about 25–30cm for taller cultivars, following the packet where it gives a different final size.
For continued leaf harvests, make small repeat sowings every two to four weeks instead of filling the whole row at once. Weather controls crop speed, so use the condition of the previous batch—not the calendar alone—to decide when another sowing is useful.
Dill forms a taproot and is generally more reliable when direct sown. If an indoor start is necessary, sow one seed per module and transplant the intact plug while young, before roots circle. Harden seedlings off and set them at their previous depth without teasing the roots apart. This direct-sowing preference is shared by the University of Minnesota Extension dill guidance.
Grow dill in containers or the ground
In the ground, space rows far enough apart to weed, water and harvest without leaning on brittle stems. Keep the bed open around young plants; established dill casts only light shade but crowded seedlings compete for moisture and become spindly.
For containers, choose a pot at least 30cm wide and 30cm deep, with unobstructed drainage, and fill it with fresh peat-free multi-purpose compost. A container of roughly 10 litres or more can support up to three compact plants after thinning; give tall cultivars fewer plants or a larger pot. Direct sow into the final container to avoid root disturbance.
An indoor dill crop needs a genuinely sunny window or planned grow light and good airflow. A bright-looking room is often too dim. Indoor plants can become unusually tall and may need a slim stake, but support will not correct insufficient light.
Water, feed and support
Water when the upper soil starts to dry, soaking the root zone and then allowing surplus water to drain. Pay particular attention to pots and newly established plants during warm weather. Repeated drought encourages early flowering, while constantly wet compost can damage roots and promote weak growth.
Dill does not usually need frequent feeding. Use a soil test before amending garden ground. After the initial nutrients in potting compost decline, apply a dilute balanced liquid feed only if growth indicates a need and the product label supports use on edible herbs. Do not use extra fertiliser as a treatment for bolting.
Shelter is usually enough for compact plants. Stake a tall or indoor plant loosely before it leans, keeping ties below the main flower heads. Do not cut the central stem simply to shorten a seed crop; choose a compact cultivar where height is a recurring problem.
Manage flowering and seed development
Once dill starts forming umbels, leaf production slows. If leaves are the only goal, pinch out the earliest flower stems and keep taking shoot tips, but expect to replace the crop rather than reverse mature flowering indefinitely.
Leave some vigorous plants to bloom if you want flowers or seed. The flat yellow umbels attract pollinating and predatory insects. For culinary seed, keep these plants watered through flowering, then reduce intervention as the seed heads dry. Bag or harvest heads before ripe seed scatters if self-sowing is unwanted.
Diagnose common dill problems
| Symptom | Likely causes to investigate | First checks |
|---|---|---|
| Patchy or failed emergence | Dry seedbed, cold saturated soil, seed buried too deeply or old seed | Moisture at sowing depth and sowing date |
| Tall, pale or leaning stems | Insufficient light, crowding, excess feeding or wind | Direct light, spacing and stem base |
| Small plant flowers early | Heat, drought, root restriction or natural cultivar timing | Recent weather, container depth and watering |
| Lower foliage yellows and plant collapses | Saturated roots or poor drainage | Drainage holes, soil smell and root condition |
| Shoot tips curl or feel sticky | Aphids | Young growth and leaf undersides |
| Seedling foliage is ragged or disappears | Slugs or snails | Night-time activity and hiding places |
| White coating develops on leaves | Powdery mildew favoured by stressed, crowded growth | Airflow, spacing and watering pattern |
The Utah State University Extension dill guide notes aphids and powdery mildew among the crop's occasional problems. Identify the cause before acting. Use barriers, airflow, careful watering and removal of badly affected material first; any product used must be labelled for the specific problem on edible herbs, and its harvest interval must be followed.
Harvest, store and finish the season
Start leaf picking at about six weeks, or once plants have enough foliage to spare. Snip a few outer leaves or shoot tips and keep at least a third of each plant growing. Harvested dill wilts and loses aroma quickly, so cool it promptly and use it fresh. For longer storage, freeze clean, dry sprigs; drying is possible but usually loses more of the fresh flavour.
Cut flower heads for the kitchen while they are green and flexible. For mature seed, wait until the fruits turn tan to brown but cut before they drop. Place the stems upside down in a ventilated paper bag until fully dry, clean out stem fragments, then store the seed in an airtight labelled container away from heat and light.
Dill dies after setting seed. Remove diseased remains and compost healthy material, or leave selected dry heads to self-sow where volunteer seedlings will be welcome. Record the cultivar and dates of the longest-lasting leaf crop, because local temperature, light and moisture will give a better succession plan than a fixed national schedule.
Sources and review basis
- How to grow dill — Royal Horticultural Society
- Growing dill in home gardens — University of Minnesota Extension
- Dill in the garden — Utah State University Extension
Reviewed against UK guidance and university extension material on 28 July 2026. Sowing windows, support and harvest timing vary with cultivar and local weather; use regional advice, a soil test and product labels where they are more specific.